Showing posts with label Nail Care Routine. Show all posts

August 15, 2013

Julep Hand Scrub Review

Purchased by Me

Tonight I would like to do a quick review on Julep's Glycolic Hand Scrub. I received this sample in one of my past Maven boxes. To me a hand scrub is essential. It helps to remove dead skin after the use of a cuticle remover and helps to soften the sensitive skin around your nails and nail beds.


The consistency is a typical scrub. I like this one because it's not too harsh. It has a nice feel to it which is strong enough to get the job done, but not too scratchy for sensitive cuticles. It contains 10% glycolic acid and makes your hands so soft after just one use!


I use this all over my hands. It's even gentle enough to use on your face, according to the Julep web site.

I also like to use a scrub when I swatch polishes here on the blog. When you swatch a polish sometimes small bits of the polish remain on your skin after you remove it, and it can be very messy if you are wanting to swatch another polish right after. I use the scrub in between polishes changes and it makes my fingers feel and look fresh for each polish change.


 The scrub retails for $23.00 and the Maven price is $18.40. I know that seems like a high price, but you only use a small amount for each use. You can also take advantage of discount codes or sales and grab a tube for a reasonable price.

I love this scrub and will be purchasing a full size bottle for sure. 

Thanks for visiting!
Purchased by Me

May 10, 2013

Crabtree & Evelyn Hand Scrub and Lotion - 60 Second Fix for Hands

Purchased by Me
 
First, before I get to the 60 Second Fix for Hands, I just wanted you to all know that as you read this I am currently on my way to St. Louis International Airport. I'm headed to New York this up coming week to spend Mother's Day with my Mom. I'm BEYOND excited to see my Mom!!!!!

 I haven't been home in over 2 years (she came to visit me last year), so I'm looking forward to seeing all my friends and family. This was a sort of last minute trip, so unfortunately I was not able to line up Guest Posters for my absence.  Have no fear!!! The blog will NOT go silent in my absence. I have several posts auto scheduled (like this one lol) to keep the blog going for the time I am away. Also, I will be on Facebook a lot since I will have so much time off.
So, in short I won't be here but I will be here :) On to my post...

For those that follow my blog and follow me on Facebook, you may remember last month I took a trip to Chicago. While I was there, I hit the Mall and came home with this...


I'm not a big Crabtree & Evelyn Fan, but for some reason I was drawn to the store this time around. I went in and sniffed around (sniffed around - as in smelling and touching everything lol).  The Sales Associate was very polite, and not pushy at all. She did notice me looking at the scrubs and offered to do a hand scrub for me. I love in store demonstrations, it gives me a chance to test products that I would normally not purchase.

She grabbed the set shown above, and did her thing. I loved the feel and the smell of it. I'm really big into hand scrubs. When I use cuticle remover, I always follow that up with a scrub. I also like to use scrubs in between nail swatching....Yes, you heard me right. After I swatch a polish, I remove it, add cuticle oil, and then use a scrub, dry my hands and move on to my next swatch. It cleans things up nicely. After the in-store demonstration, my hands felt like SILK. They were soooooo soft. There was no way I was walking out of that store without this set lol.
This is what is included in the box...

The scent on the scrub and lotion are very strong. I decided on the Citron because I love all things citrus. The set does come in other scents. After you use the scrub and lotion, the smell lingers for at least an hour afterward, so make sure you love the scent.

Call me old fashion, but I love that the scrub comes in a metal tube. The lotion is in a plastic tube. There are just three simple steps:
1. Scrub
2. Rinse
3. Apply Lotion
 

The scrub is very granular and very scruby. Wait...is scruby a word??? - It is now lol. This is no weak or gentle scrub.  For me that's perfect, it gets rid of all that dead skin on your hands and cuticle area. I really LOVE this scrub.

Now the one surprising factor of this scrub is it does not rinse squeaky clean.  It feels as if you have already applied lotion. I highly recommend going into a store for a demonstration to make sure you really like the texture and soft feel after the scrub.
Purchased by Me

March 19, 2013

Top Coats - Part Three

Purchased By Me

Tonight I have the 3rd installment of my Nail Care Series. We are going to tackle top coats today. As I stated in my other installments, I want to remind everyone these are just my preferences. Everyone reacts differently to products, and I can not promise that everyone will have the same positive experience with these products as I do.

TOP COATS


My Current Favorite combination to date that I use most often is:
 NYC Grand Central Station and Seche Vite.


Grand Central is a pretty impressive fast dry top coat that I apply under my Seche Vite. It is very inexpensive and works perfectly for what I need it to. It can be purchased at most drug stores.


Next is Seche Vite. Now, you may be asking yourself why I use BOTH. Why do I layer NYC Grand Central under my Seche Vite? Reason: Seche Vite is one of those top coats that has crazy behavioral problems. Mainly it causes what is called 'shrinkage'. This doesn't occur in all users, but it does with me.

Shrinkage: When the top coat causes the nail polish below to shrink ,so to speak, and pull away from the nail edges. It's most evident on the free edge (tip of your nail). The best and easiest way to describe it would be: It makes your nails look as if the polish you have on is worn out like tip wear.

Seche Vite is infamous for shrinkage. You can prevent shrinkage by thinning the polish with Restore or you can layer it over another top coat, and that is what I do. It may seem like a waste to use another top coat underneath, but it is very worth it. To date I have not found a better top coat than Seche Vite.

POSITIVES:
 *Self Leveling
(levels everything better than any other top coat)
*Best Shine
*Fastest Drying Time

NEGATIVES:
*Causes Shrinkage
*Needs to be thinned CONSTANTLY

Keep in mind if you would like to use Seche Vite you have to decide if the extra steps are worth it for you, and for me they are. Seche Vite can be purchased at Sally's Beauty Supply.


Next up is Posh. A lot of people that refuse to use Seche Vite tend to use this as an alternative. It does not seem to have the shrinkage problems that Seche Vite has. It is not without its faults as well. To me this tends to be too temperamental for me.  Some times I have great luck with it and others I do not. I have had polishes where it wrinkled the finish completely and I had to start over. It does not dry as fast as Seche Vite and it is not as shiny. The times it does work, it is a nice top coat. I have not decided if I'm going to purchase this again once I finish off this existing bottle.This polish also needs thinner regularly to keep it from getting too thick.  Posh can be purchased at Sally's Beauty Supply.


Next is Good to Go by Essie.  This top coat I LOVE. It does not dry as fast as Seche Vite, but it is very shiny. It does not require the thinning that the two others above do, and it does not cause shrinkage. Unfortunately, it does not have that beautiful self leveling property that Seche Vite has that I really love and think is very important in a top coat. This can be purchased at Walgreens.


(*please note that both the Good to Go and Posh do not have a normal faint pink coloring, this is because I used them on red polishes that caused the discoloration).

The next two polishes I use occasionally, they are both also popular favorites with the nail blogging community. Sally Hansen's Mega Shine and Insta-Dry. Both of these polishes can be purchased in any major drug store. I know many nail bloggers that swear by these two top coats. I like both, but to me they lack the self leveling power, shine, and drying speed that Seche Vite has.


Many will argue that they are better than Seche Vite, so I believe it is a personal preference. I think it's bet to try each, until you find the one that really wows you. 

Another top coat that I use often is Seche Vite UV. There are times when I have ZERO time and need my nails to dry yesterday.  This is when I turn to this.


This can be purchased at Sally Beauty Supply and is an absolute MUST for me at times. This does require the use of a UV LAMP/LIGHT. After applying this I place my hands under the dryer, and in minutes my polish is dried solid. I can be washing dishes and cleaning within 20 minutes or less. I swear by this stuff and if you can afford to purchase a light, this is a must have. I will go into more detail on my light in my last and final installment of this series, so stay tuned for that.

Another must have top coat for me is Glitter Food (aka Fix a Flat) by Nail Pattern Boldness. Glitter Food can be purchased HERE. This is a must for the glitter junkies out there like myself.  If you want a really smooth finish to a normally bumpy glitter... this is this answer. I apply one or two coats of this and then finish it off with Seche Vite. The reason I finish it off with Seche Vite is Glitter Food does dry matte, so add your favorite top coat to bring back the shine. I have had the bumpiest of all glitters feel smooth as glass after applying this.


Last in my arsenal of must have top coats is MATTE top coat. Everyone should own at least one of these. I have tried both China Glaze Matte Magic and Hard Candy's matte top coat.


I prefer, by far, Hard Candy's. It applies much easier for me and is much more affordable. Unfortunately, Hard Candy just discontinued this when they introduced their new line recently. It was pretty heart breaking for me because I will have to search for a new brand. I was smart enough to raid my local Walmarts and collect up as many as I could find before Hard Candy switched over to the new line.


These should last me for awhile. I will have to face it eventually, just not any time soon :)

I hope the following information was helpful. If you have any questions or comments please leave them below and I will address them as soon as I can! Thanks for visiting.

March 8, 2013

Base Coats - Part Two

Welcome back to my mini series of nail care. Part One - Cuticle Care can be found HERE. Tonight we are moving on to Part Two of the series...

BASE COATS 


I would like to mention before I get started, that base coats vary greatly from person to person. Some base coats can work wonders for certain people and others hate that same base coat. Each individual has different body chemistry so I can't promise what works wonderful for me will do the same for you. I had to go through a lot of different brands of base coats before I found the ones that worked best for me.


MY FAVORITE GO TO BASE COAT COMBINATIONS: 

I wear a ton of glitter polishes, so having a decent base coat is very important to me. My favorite and top choice is Barrielle Camouflage. This bottle is super old and it now comes in the newer style bottle. It can be purchased at Transdesign in the newer bottle style. This works wonders for me. It goes on very thin and provides a nice sticky type base for me.  It helps to prevent staining as well. I have several polishes that have permanently stained my nails, which is no fun. This works great for anti staining.


I also like Orly Nail Armor, which can be purchased at Sally's Beauty Supply.
This is much thicker, but also works wonderful.  What I love about using this as a base is that it has a Ridgefiller built right in.  I have had really good results using this as a base coat.


Finally, is Barrielle Hydrating Ridge Filler. This can also be found on Transdesign as well. This is a nice hydrating base coat. I do get dry brittle nails some times, and this helps prevent that. This is much thinner then Nail Armour.


I also like to venture out...

When I want a less thick base coat for a simple solid creme polish, non glitter polish, I use Essie Feed Me. I really do like this one. You can purchase this is Walgreens and other places that carry Essie.  I usually use the next four bases for non glitter polishes


Essie Sensitivity Base Coat.  This is a mini bottle size. Another favorite here.


Poshe treatment base coat. I use this if my nails start to peel or show signs of breaking. This saves a step if you are wanting to treat your nails as well as apply a base coat.


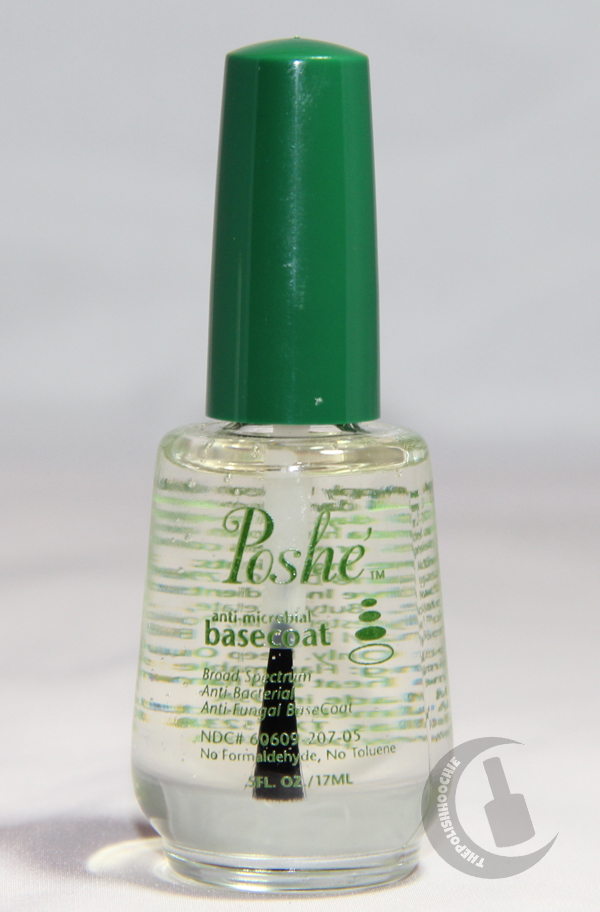
Finally, Posh antimicrobial Base Coat.This prevents fungus on the nail. now granted I never got a fungus from a manicure...but anything that prevents fungus works in my germaphobe world lol.


I have tried many other base coats as well, but so far I stick with these. Variety is important to me. In no means do you have to own all these base coats in order to get a good manicure. Some people like to just use one kind for everything. I have not had luck that way. I do suggest you do use some sort of base coat. A lot of people skip this step but it really does help protect your nails. Especially if you are changing polish often like myself.

Here are some examples of combinations...

A glitter: Barrielle Camo, Nail Armour or Barielle Hydrating Ridge Filler.

A smooth creme: Essie Feed Me, Essie Sensitivity Base coat, Poshe Anticmicrobial

When nails feel week and and start to break and peel: Poshe Treatment base coat, Feed Me

 One of the only bases I plan to add in the future is an aqua base. This is supposedly excellent for all hologrphic polishes. I am not sure which brand I will go with yet on this. Once I decide, I will edit this post to include it.

Thanks for reading guys and stay tuned for Part Three on Top Coats, coming soon!

March 5, 2013

Cuticle Care - Part One

Due to popular demand, I will be doing a small series on my nail care routine. I get a lot of questions about how I take care of my nails and what products I use, etc. so this post will hopefully answer a lot of your questions. I did a post similar to this when I first started this blog, but it is now very outdated. At lot has stayed the same and a lot has changed. Since my routine and products are bit extensive, I'm going to break this post up into 4 Parts..
  • Cuticle Care - Part One
  • Base Coats - Part Two
  • Top Coats - Part Three
  • MISC - Part Four
 First up is ...
Cuticle Care  - PART ONE

 
I always start my cuticle care with cuticle remover. I let the remover sit on my cuticle area for a minute or two, and then I push back my cuticles (very gently) with a cuticle pusher. I use CND Cuticle Away as my cuticle remover. I like this particular remover because it is very gentle on my cuticles. I have very sensitive skin and any other remover I have tried turns my skin around my cuticles red and puffy, CND does not. I purchased this from Transdesign, but I do not believe they carry it any longer. I will have to find a new source myself once I run out. I can tell you that this bottle shown below is 3 years old. I use very little. 


Here are the tools I use to push back my cuticles and trim hang nails once the remover has sat on my fingers for one to two minutes.


The cuticle 'pusher' pictured on the left was also purchased at Transdesign. I love this pusher because of the hook end which comes in handy for cleaning under the nail. The cuticle clippers show on the right are from Sally Hansen and can be purchased at any Drug Store. I only use the clippers to clip hang nails. I never EVER NEVER clip my cuticles. I have tested this out and my cuticles will grow back harder and more fierce if I clip them. The skin gets tough and unmanageable. It may look neat and clean when you first do it, but in the long run it is not worth it. Once I started using remover and a pusher, my cuticles grew very little and were much more manageable and pliable.

I always sanitize my tools prior to use. I'm a HUGE germaphobe, but when doing anything to your cuticles you should always use clean tools. I purchased Mar-v-cide cleaning solution and a container from Sally's Beauty Supply for cleaning my tools. You just dip them in the solution for 10 minutes, and then they are ready to use.


After I 'push' the cuticles with the scoop end of the pusher, I end up with a lot of remover and dead skin on my fingertips. I head to the sink and do some scrubbing. 


My scrubber of choice is California Mango Buff. This scrub is gentle and cleans things up really nicely and I love the smell of it too. It gets rid of the cuticle remover and dead skin very well. I purchased this at Sally's Beauty Supply. You can use any kind of hand scrub for this step.

I then move on to disinfecting. YES, disinfecting AGAIN. This is what germaphobes do lol. I spray my fingers with disinfecting spray, Sea Breeze. If you have ever went to a professional nail salon they would have sprayed your hands with this after cleaning your cuticles. I was thrilled to find out that Sally's Beauty Supply carries this as well.  I love the smell of this stuff and it makes me feel confident that if I pushed any dirt, germs etc under my cuticles, I will not get any weird infections. In my mind, my fingers will get infected and fall off otherwise, of course :) 


My final step is to apply cuticle oil and lotion. I first apply the cuticle oil and then I seal it in with the lotion on top.


My choice items are Barielle Intensive Nail Renewal Oil and Burt's Bees Lemon Butter Cuticle Creme. In the 3 years I have been doing my own nails I have tried CRAZY amounts of Oils and Cremes. I have tried every one available on the market, and these two work best for me. The oil is very light and not too greasy and the butter seals things in very nicely. My cuticles have improved 100% since I started using this combination.

This is something you do have to experiment with. Everyone's skin chemistry is different and will react differently to varies products. A lot of oils were extremely greasy and actually drying out my cuticles and making them very hard. It took me a while to find my winning combination. I wish I could say this combination will work for everyone, but I'm afraid you will have to experiment on this part.

I hope this is helpful. After I let the oil and lotion sit for awhile I will go wash my hands and move on to applying a base coat...

Stay tuned for Base Coats - Part 2 coming soon!

ShareThis

Related Posts Plugin for WordPress, Blogger...